The Great “Cork” Wall
- By
- Roll Cork

Thinking of re-decorating your den, kids bedroom or your home office wall? Ever considered using cork?
Why Consider Cork?
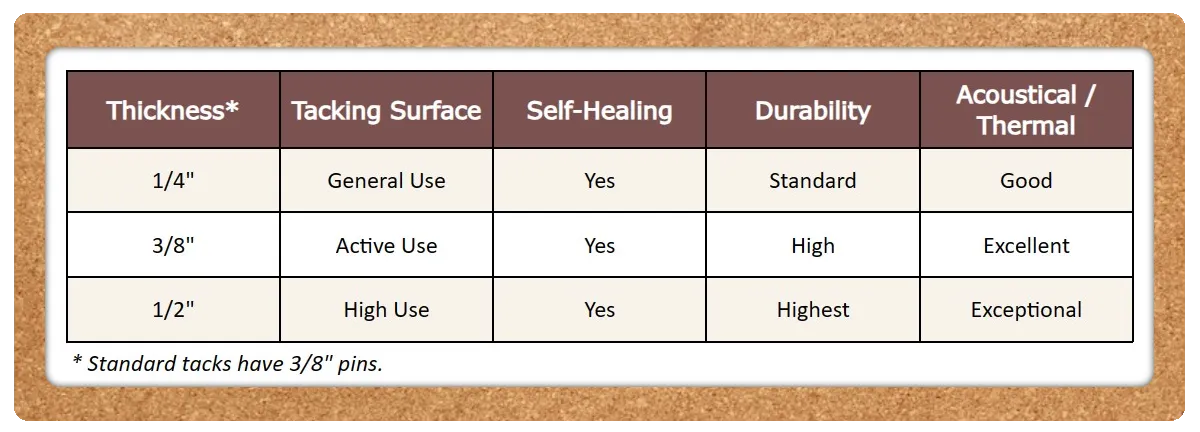
Natural cork rolls offer an excellent alternative to painting, paneling or wall paper. The natural beauty of cork combined with it’s excellent self healing and tacking quality make it a wonderful choice. As an added benefit, cork has outstanding acoustical and thermal qualities. There truly is no down side.
Whether installing a full cork wall or just a partial area the warmth of material will be felt immediately. You can stain or paint cork to match the décor of your room, or simply allow the natural earth tone color of cork to become the focus. Regardless of how you treat it, you will certainly enjoy the maintenance free, virtual indestructible qualities of cork.
Your new cork wall can make:
- An excellent background for art
- A very functional background for a dart board or pining
No matter how you use it you are bound to love your new cork wall surface.
Installing your Cork Wall is a breeze
Fortunately it doesn’t require a professional. Here are the simple steps for installation:
- Carefully measure the space you intend to cover and mark the cork accordingly.
- Make sure the wall is both clean and dry and that the surface itself is secure.
- Using a utility knife and a straight edge, cut the cork roll to meet your previous measurements. Keep in mind that you may have to take a second pass to ensure the cut goes all the way through the cork.
- Using the recommended Henry brand #356 or #176, apply the adhesive to the wall evenly and thoroughly using a v-notched trowel. Be sure to spread the adhesive to the entire area that will be covered by cork.
- Take the cork and gently place it on the wall in the desired location. The adhesive will still be somewhat wet so you should be able to move the cork slightly if you need to fine tune the placement.
- Press firmly on the entire surface of the cork (rolling is recommended) to make sure the entire piece of cork comes in contact with the adhesive.
- Hammer brads or headless nails into the corners along with any other areas that may not adhere well.
That’s it!
Don’t forget that you can stain, paint or varnish your cork wall. Be sure to test on a spare piece first, though!
We’d love to hear how you’ve used your cork wall. Let us know below!
